
I'm working on creating a pack of stylized swords. But here's the interesting part; I'm using this to piece together a workflow which allows me to automate nearly everything outside of the initial sculpt.
First of all, keep in mind that this only works because I'm specifically creating stylized hard surface assets.
If I were making anything organic that needs to bend and deform, or making anything highly complex in design, the workflow would probably fall apart.
Not only will this allow me to pump out assets stupidly fast, but it makes it perfectly viable for me to create my hard surface assets entirely in ZBrush without a bunch of hassle, which I love.
I've automated the majority of the texturing phase with the use of various custom Smart Materials in Substance Painter. All I have to do is throw them down in layers and mask out where I want them to cover.
As for the retopology and UV mapping, I've found a way to do this automatically in Houdini using their new Game Dev toolset.
Here's basically how it looks so far.
I sculpt out my sword in ZBrush enough to get the basic form, then send this over to Houdini as a sort of midpoly to be auto retopo'd and UV'd. The key is to do this before adding the higher details to the sculpt (like cuts, divots, cracks, bolts, etc), because otherwise it would try to account for those in the lowpoly geometry.
I finish sculpting out the details for the highpoly in ZBrush, then take the high and the low over to Painter to bake out the maps and apply the Smart Materials.
Done.
With this workflow, basically all I have to do is sculpt. Something that would take days to finish can be done in hours.
With that in mind, here's some comparison results between when I made the sword by hand (aside from the texture; that was done with smart materials originally as well), and when I automated everything beyond sculpting.
I did this comparison by taking the lowpoly from the completed hand-made sword, subdividing and remeshing it to get a high-density equivalent to a midpoly I would have made, then ran it through the automation.
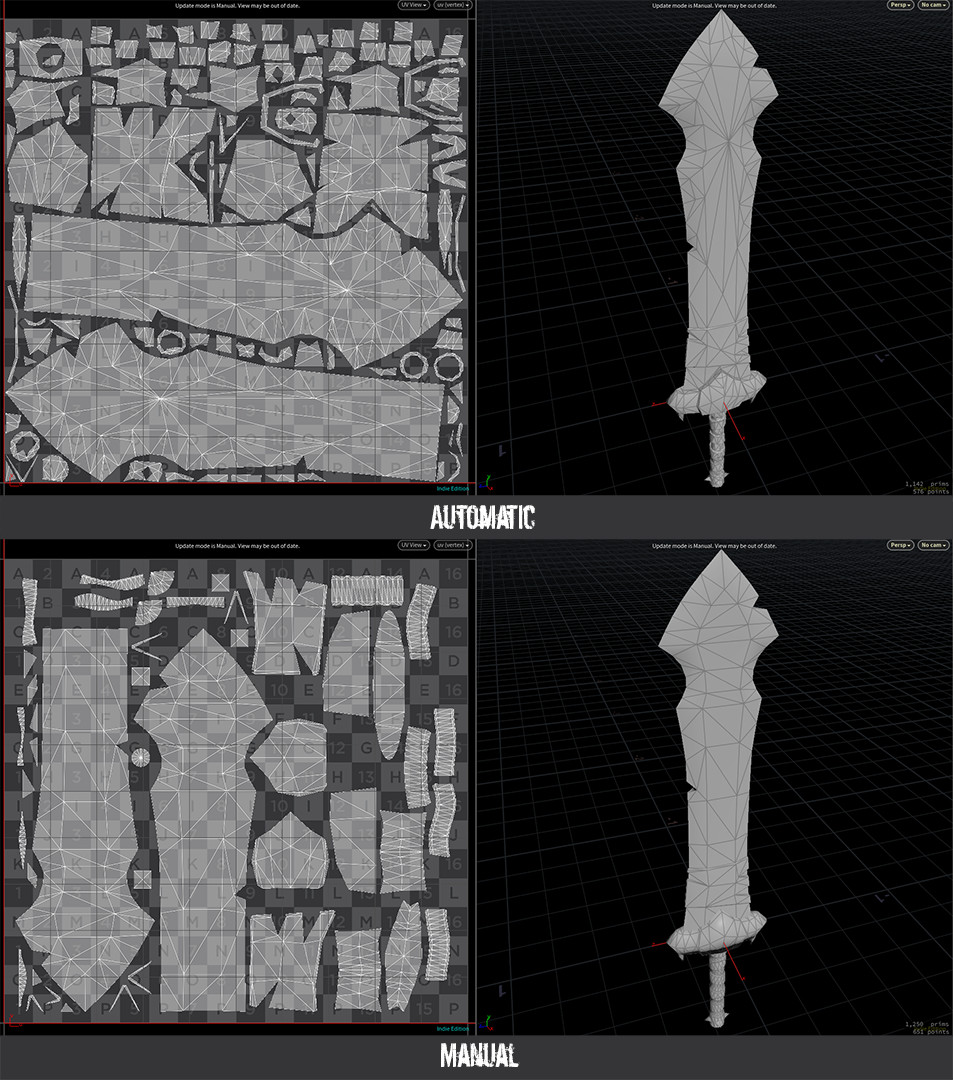
Unfortunately it has more UV islands, but it still falls within acceptable levels. The packing algorithm in Houdini is also so amazing that it wound up making WAY more effective use of UV space, while still maintaining even texel density.
The topology looks pretty messy, but it bakes and shades perfectly fine, and actually wound up using 108 less triangles, making the topology better than the original I had made.

Here you can see the final result, with all textures. The two are virtually identical.
The automated one is slightly less efficient due to the extra UV islands, but I've managed to MASSIVELY reduce the time it takes to produce a final result for use in-game.
The entire post-sculpting phase of retopologizing, UV mapping, baking and texturing all took literally minutes to finish.